While doing the voice-over narration of the audio and video, we have plenty of options to play with, and in this guide, we will be following some easy methods of how you can use your voice-over narration through NeoFilm video editing software.
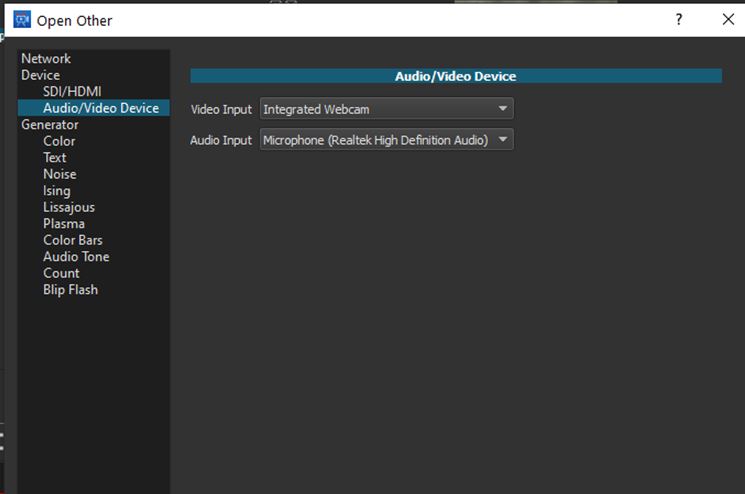
In the previous article, we have discussed the feature Open Other. Any click on this option, a separate window or panel will be opened there you will find some others options as well. When you select the option “Open Other” on the left-hand side, you will find more than ten other options, and one of them is Audio/Video Device.
In this option, it will have two dropdowns; the first one is video input, and the second one is “audio input” and the “video input.” In the video input dropdown, we will have two options one is none, and another is “integrated webcam.” You will find an integrated webcam and, as default, when you select the audio with device option under the open other feature. In the audio input drop down again, you will have two options one is none, and another is microphone (Realtek high definition audio).
While we discuss all the left-hand options, the first one, “network,” allows you to capture the video from the remote URL.
- The list of the option “Generators” provides you with an array of related video or audio filters; however, it’s mainly useful for an existing segment of the video or audio track rather than the transforming. Using this option, you can create a new video or audio segment with plenty of properties.
- The option “devices” is specifically coming for the option DirectShow. It is an API framework of Windows multimedia currently built-in for NeoFilm video editing software.
- The option SDI / HDMI is useful if you want to improve the protocol for any other external devices.
- By selecting the option DirectShow, you can use it on your computer as the input device.
- After using this option, you can set your input devices and accept them for the input of your audio from the mic, and then you can hit OK.
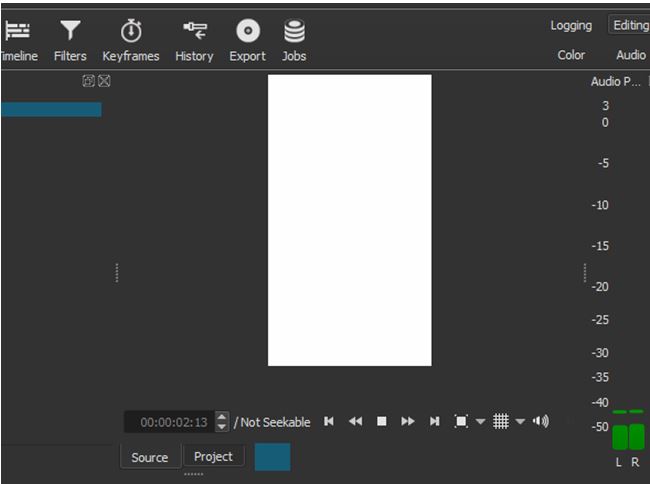
- Once you click on OK white blank OK Screen will be appeared because you have not chosen the video input. In addition, you can see the peak meter it is reflecting that the NeoFilm software is now monitoring your audio input device; even if you speak, it measures everything.
Currently, in the NeoFilm video editing software, you will find that it is monitoring your input Mike and it is not capturing the sound. To enable it, you have to open the export panel, which displays the options when you flip it from the available defaults video tab to the audio tab.
- We have discussed the properties and uses of the pot panel in the previous articles; however, some more particular differences are to be discussed and notable here again.
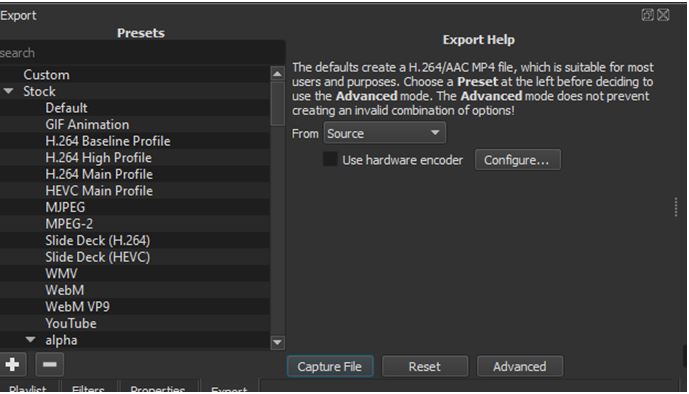
- The most useful dropdown here is DirectShow as it is used mainly as a source rather than a track and playlist item, which is usable in most export options typically.
- Also, at the bottom, you can see the option “capture file” button instead of the export button, which you generally expect while using NeoFilm video editing software.
- If you hit the button “capture file” it will be an opening and standard browser of file which allows you to name the audio track of the file which you would like to collect or specify in the particular saving location.
- Before capturing and saving the file location, you need to practice one more thing, which is to select the format dropdown option, which is, as default is showing MP4 because you have been exporting the finished video files for projects as the MP4 files. However, in this scenario, you need a more appropriate file format for the audio.
- You can select it from the available dropdown, or you can type in the search box, which is available in the upper-right location. Over there, you can choose WAV as it is the most compatible format for the audios.
- Now, when you have selected the format, click on the option “capture file“, and you will get the dialogue of file saving.
- Now, you can keep any of the names which you prefer of the file and choose the default location where you can find it the next time easily e on your computer.
Here you need to take care of the file which you want to Export, that it is the correct one which you are generating using the NeoFilm video editing software. With some practice, it will be doubtless for you, and you are all set to start narrating. In addition, if you made any mistake, you can trim that out in the captured audio.